Setting up a Windows VPN Server on Azure
I recently decided that I wanted to secure all of my network traffic using a VPN. Just search for Edward Snowden and you will come up with a few reasons why a VPN connection is a good idea these days. I am going to set mine up in Azure - just because. If you want to get a VPN connection, I would recommend buying a monthly service instead because it will be cheaper probably offers more features as well. In fact, there was a slickdeals deal just a couple of days ago for ~$5/month. The VPN server I will be setting up in Azure will run you about ~$67/month and so its really a no-brainer. This also gave me an opportunity to learn more about Azure features. So, here goes.
Setting Up A Virtual Network
The VPN server you will create later in the tutorial will be placed inside this network and the network will act as the private address space for VPN clients.
- Login to Azure and click on the Networks tab in the menu.
- Click New->Network Services->Virtual Network->Quick Create
- Enter the settings that you would like for the network. Here’s a look at mine.

Launch a Windows Server
Now we’ll setup the Windows machine that will act as the VPN server.
- Start by going to the Virtual Machines tab and click on New->Compute->Virtual Machine->From Gallery.
- Select Windows Server 2012 R2 Datacenter for the image
- In the first VM configuration page, give the server a name and set a
username and password to remote desktop to the server. I am going to
setup my server as an A1 size image. You can choose a bigger size if
needed.
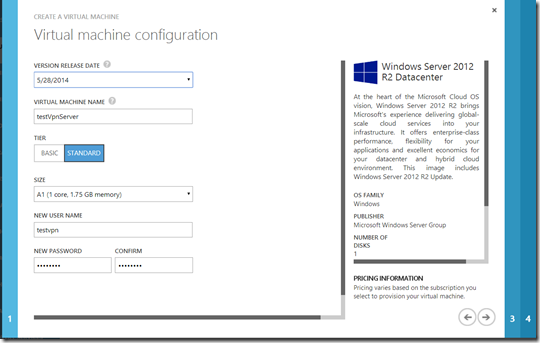
- In the second VM configuration page, there are a few settings that you need to change.
- For Region/Affinity Group/Virtual Network, choose the virtual network that we created earlier. I will choose the testVpnNetwork that I created.
- Add a new endpoint to the server. Name it SSTP and allow TCP port 443. This is required because we will be using the SSTP protocol for the VPN connection.
- Your page should look something like this.
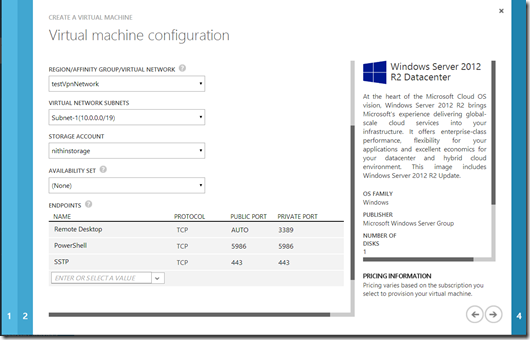
- Click the check box to create the server.
- Wait until the server is up and running and then click on connect and open the rdp file to remote desktop to the server.
Setting Up Remote Access on Windows Server
Setup Remote Access just like you would on any other windows server. It is well documented and this blog was helpful when I was setting this up. I’ll go through the important steps here.
- Add the Remote Access role to the server. On the Server Manager dashboard, select Add Roles and Features.
- Click Next until you hit the Server Roles page. Check Remote Access and click Next.
- In the Roles Services page, click Direct Access and VPN(RAS). Click Add Features on the popup window. Also check Routing.
- Then continue clicking Next and finally Install.
While you are waiting for that to finish, you need to setup the SSL certificate that will be used to secure the VPN connection. Azure automatically provisions a certificate on each VM and installs it in the personal certificate store of the Local Machine. It is a self signed certificate but it is good enough for our purposes. But since it is self-signed, it won’t be trusted by your windows client PC and so you will need to copy the cert and install it on your windows PC as a trusted certificate. We’ll do that now.
- Open MMC by clicking start and typing mmc.exe.
- Add the certificates snap in. File->Add/Remove Snap in and choose certificates and Computer Account.
- If you look in the Personal certificates store, there should be a single certificate there and it will have the same name that you gave your cloud service in Azure when you were setting up the server. My certificate is named testWinVpnServer.cloudapp.net.
- Right click on the certificate and choose All Tasks->Export. Export as a cer and save the file. You need to transfer it to your local windows pc by emailing it to yourself or transfer the file through remote desktop itself.
- Once the file is on your local machine, double click on it and click on Install certificate. Install it into the Local Machine and select Place all certificates in the following store and choose Trusted Root Certification Authorities. Click Next and Finish.
Go back to the Remote Access installation wizard and hopefully it is now complete. Click on the Open Getting Started Wizard to configure Remote Access.
Configuring Remote Access
- Choose Deploy VPN only. DirectAccess makes it easy such that your corporate website request goes through the VPN network and your netflix stream goes through your local internet. We want everything to go through the VPN network and so we will deploy only VPN.
- In the Routing and Remote Access windows that opened, right click on the server and select Configure and Enable Routing and Remote Access.
- Choose custom configuration and check VPN access and NAT. Then Finish.
- Hit Start Service to start the service
- Once its running, right click on the server name again and choose Properties. Then under the security tab, under SSL certificate binding, choose the certificate ending in cloudapp.net.
- Click on the IPv4 tab. Here you will setup the VPN server to assign IP addresses to clients from a static pool since there is not DHCP server available.
- Under IPv4 address assignment, choose Static address pool and click on Add.
- Enter an IP address range that is within the subnet you configured in Azure. I’ll choose 10.0.0.100 to 10.0.0.200.
- Hit OK and you may need to restart the service.
- Now right click on the NAT option under the Server Name and select New Interface.
- Select Ethernet2. Then choose Public Interface connected to the Internet and check Enable NAT on this interface. I chose Ethernet2 here since that is the network that is connected to the internet on my server. On your server, it might be named something else but most probably not.
- Hit OK.
- You need to give the Adminstrator user permission to connect using VPN. You can do that in MMC. Open it my searching for mmc.exe.
- Click Add/Remove Snap-in and select Local Users and Groups.
- Select the users tab and then right click on your user and select properties.
- Select the Dial-in tab and under Network Access Permission, select Allow Access.
- You now have the server setup. Let’s get the client setup as well.
Setting Up Windows 8.1 Client for VPN
- Open the Network and Sharing center. Just open start and search for it.
- Click Setup a new connection or network.
- Choose Connect to a workplace.
- Click Use my internet connection.
- Enter the cloud app service url. For me it is, testWinVpnServer.cloudapp.net. Go to Azure->Cloud services to find out the url.
- Give the connection a name and click Create.
- Click on change adapter settings from the Network and Sharing Center.
- Find the VPN adapter you just created.
- Click on the Security tab.
- Select Secure Socket Tunneling Prototol (SSTP) for Type of VPN.
- Select Require Encryption for Data Encryption.
- Hit OK.
- You can right click on the adapter and choose Connect to connect to the server. You will need to enter the same credentials you used to login to the server.
- Here’s look at my settings.
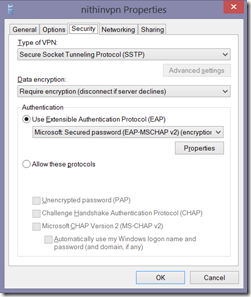
And there you have it. You are now connected to your very own VPN service. You can test it by searching whatismyip on bing and verify that the IP address matches the Virtual IP of the VPN server. Note that using a VPN server can drastically impact your network speeds. Here’s a comparison on my home network.
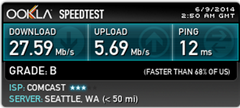
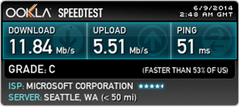
That’s right! Whooping >50% slower. Maybe I won’t have it connected all the time…hmm.